

Have you ever wished that LabVIEW treated your custom errors like the built-ins, with full call chain information and likely causes listed in the error dialogs? Would you like to be able to insert more detailed information at individual error sites and have that information appear in the dialog so you wouldn’t have to pop up an additional dialog box to help the puzzled user?
Would you like to be able to specify your error with an intelligible enumerated constant rather than trying to remember which error code you assigned to which type of error? How about having these enums start at some code in the user error range (5000-9999)? Wouldn’t it be nice if these enums could contain a few errors, e.g., file not found or timeout, with the error codes that NI assigns?
Different projects use different equipment. Wouldn’t it be nice if lists of errors could be combined easily on a session-by-session basis so that you’re only treating the errors pertinent to the current setup? Of course, if one set of error codes overlaps another you should get multiple possible explanations, labeled by package, just as the overlapping DAQ and GPIB codes are handled.
When you use someone’s DLL, wouldn’t it be nice to be able to convert the (typically negative) C error codes to the LabVIEW User Error Code range—and lift the C comments to use as explanations in the LabVIEW error dialogs?
How about being able to set a default error dialog type for the entire session—and to change it temporarily or permanently at any point in the program?
All these features are included in the new error-handling package from ![]() . They are all compatible with the standard error-handling routines from National Instruments, so they integrate smoothly with your current code. You get to choose which features make sense for each project, or even each part of each project. (Severability! — Who said that reading those licensing agreements was a waste of time?) See both the text and figures below (included in their entirety and resized for convenient printing in the downloadable package) and the context sensitive help (ctrl- or cmd-H) for more details. Be sure to try the two Demo VIs as well.
. They are all compatible with the standard error-handling routines from National Instruments, so they integrate smoothly with your current code. You get to choose which features make sense for each project, or even each part of each project. (Severability! — Who said that reading those licensing agreements was a waste of time?) See both the text and figures below (included in their entirety and resized for convenient printing in the downloadable package) and the context sensitive help (ctrl- or cmd-H) for more details. Be sure to try the two Demo VIs as well.
While the order listed above might be a good one for developing or expressing a wish list, explaining the package in that order will lead to considerable confusion. To understand the package, we must start with the basic components and build up to the full structure. The previous section will give you a reference for determining where the different structures, VIs, and controls fit in the overall picture.
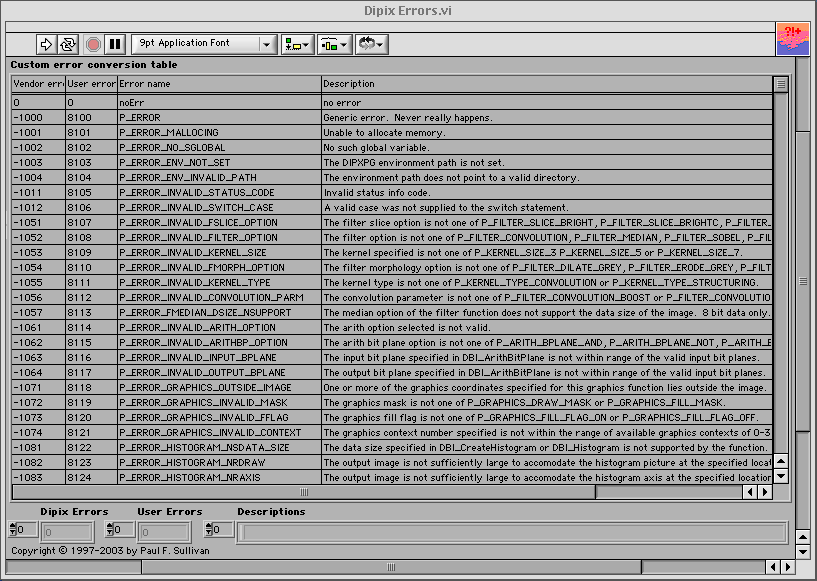
Perhaps the most intelligible starting point is one (or a sampling) of the VIs that define the data for this package. Figure 1 shows the front panel of a VI that captures the error definitions for a Dipix XPG1000 video image capture board. From the size of the scrolling thumb on the table (not the front panel window’s thumb), one can tell that only a small portion of the error table is visible. (In fact, this VI defines 545 different error codes. A separate VI captures the 38 warning codes for this same device.)
NOTE:
For convenience, the download is linked with the Dipix and JDS SWS VIs and controls in the Error Handling folder. In reality, these and other device specific files should more probably be in the appropriate device folder in the instr.lib folder.
The data values are stored as text in the columns of the table, making it very easy to lift data from text files such as the header file shown in Figure 2. The first column lists the error codes defined by the vendor. These are the codes that are returned from DLL calls. The second column lists the codes from the user error range (5000-9999) that you wish to assign in place of those defined by the vendor. The first entry must be no error with value 0 and the rest should be in contiguous ascending order. (The Dipix warnings were handled by a separate file so that the errors and the warnings could be non-contiguous.) The third column lists the error names as they should appear in the error enum. These values should be brief but intelligible. (The Dipix names were longer than we would have liked, but we kept them as is to facilitate comparing LabVIEW and C code. The fourth (and last) column contains the description of the error that will appear in the error dialog boxes. Sometimes, as in this case, the vendor's error descriptions can be extracted from a C header file with the aid of the utility Extract C Comment.vi.
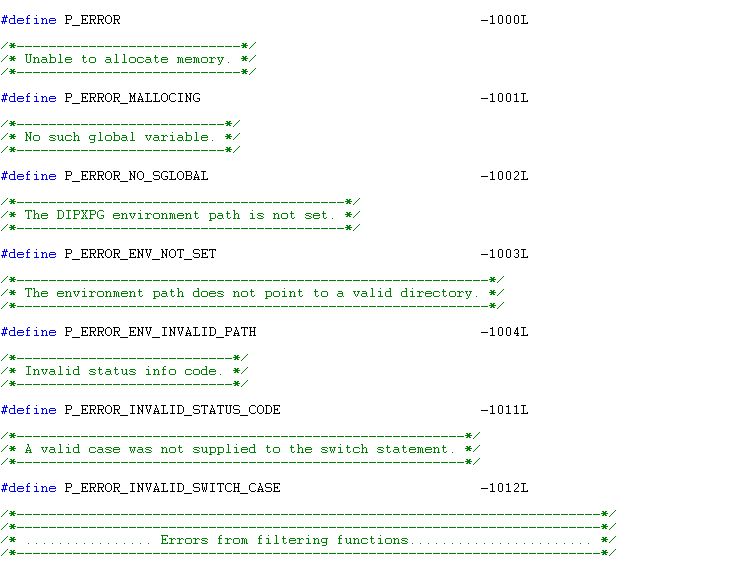
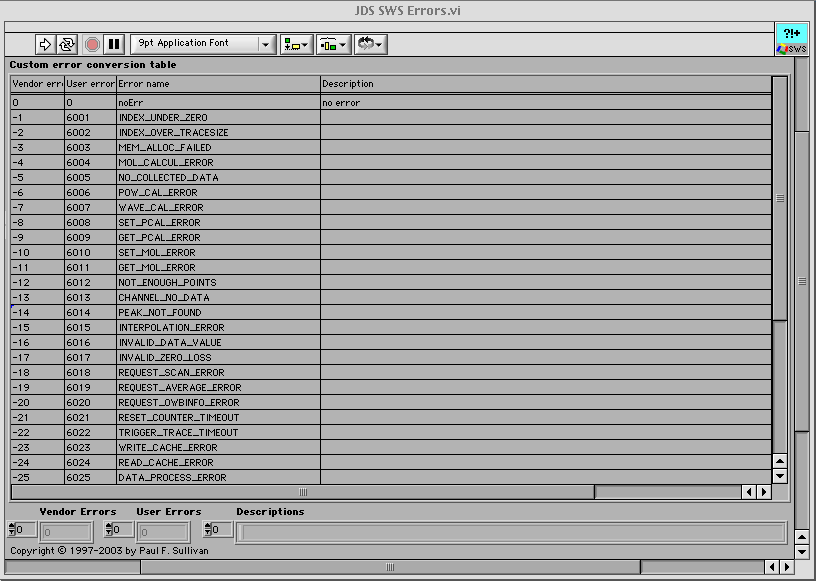
In many cases, you will have a C header file or the equivalent from the vendor that contains all the pertinent information other than the LabVIEW error codes. Judicious use of text editors, spreadsheet programs, and short LabVIEW routines can quickly extract the appropriate data for pasting into the table. This is, of course, indispensable in the case of a device with 500+ error codes. For a lesser list, the table can be filled entirely by hand. Sometimes, as in the case shown in Figure 3, only part of the information is available and you must fill in the rest by hand. (Or, as we did here, leave the descriptions blank and rely on the error names' being explicit enough. Remember that the introduction said that inconvenient features could be left out with impunity. In fact, if customized, detailed, individual comments were used religiously, only a single, generic error with no explanation at all would be perfectly suitable. In most cases, a selection of well-named and well-described errors is probably the more convenient approach, however.)
WARNING:
Once you have the table filled in, be sure to make its current value the default or you will lose all your work!
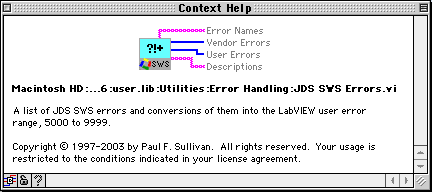
The text table is fine for the human interface, but the computer prefers different formats. The first time in any session that one of these error definition VIs is called, it parses the information into forms more useful to the computer (Figure 4). These reformatted data are held in shift registers so that they are available without the parsing overhead on subsequent calls.
Obviously, the data in the first two columns can be used to convert vendor error codes to the LabVIEW User Error Range. We provide a VI for this (Figure 5) and suggest that you incorporate that VI and the error definition file into another VI and include your new VI in each VI that calls the DLL, as we have done in Figure 6. (For the moment, ignore the Chained Find First Error block on the JDS SWS Blink diagram; it's a utility dating from 1997 whose updating we'll get to later. Just register that a code in the user error range has been passed on to a LabVIEW VI.)
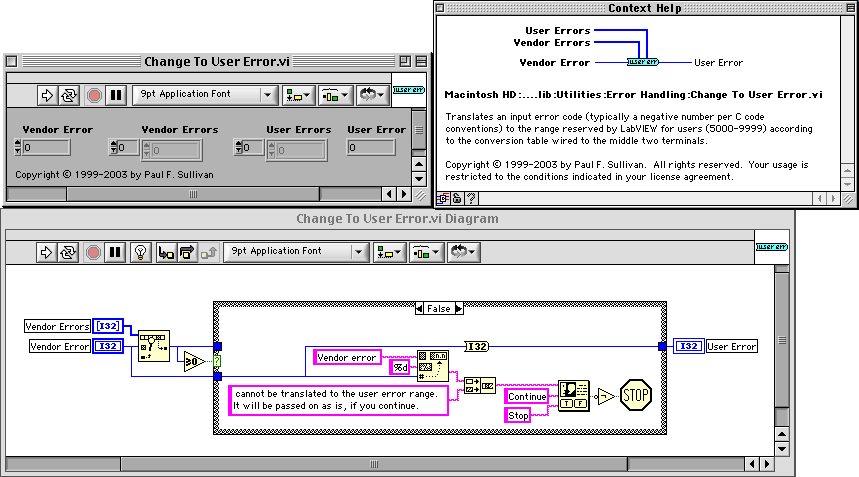
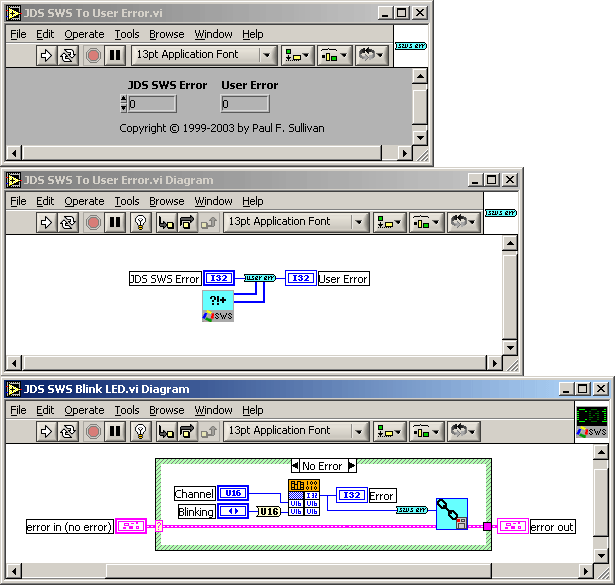
(Did you notice the differences in appearance between the last two figures? The LabVIEW code is platform independent, but the DLLs are not. I had to shift platforms to avoid a broken arrow in Figure 6.)
Of course, not all the errors you'd like to report come directly from a DLL. Sometimes you'd like to drop an error constant of your choice onto the diagram of a VI. You could just plunk down a number, but that wouldn't be very intelligible to your reader. Putting a label on the number would help your reader understand what was going on, but that's a heavy burden on you. Typing the label each time is bad enough, but trying to keep track of what number was assigned to what error is a bear. (I resorted to a cheat sheet diagram with lots of labeled numbers on it.) If you ever decide to change the number assigned to a certain type of error (because it conflicts with another package you're using, for instance, even thought these error routines handle such conflicts quite well), you're really up the creek. This is a perfect application for an enumerated type def., but we'd like an enumerated variable whose values are in the User Error Range and not simply a continuous positive progression starting at zero.
Our ideal error enum really should have zero as its first value. Zero is LabVIEW's choice (and the choice of most other programming languages, as well) for the "no error" case. A Select function could then be wired to choose between "no error" and your error of choice depending on some test on your diagram (Figure 7). If the first value is defined as zero, then why not use the string entry for that value to indicate an offset to apply to all other values to put them in the User Error range? Then the enum would contain all the information necessary for decoding the desired value.
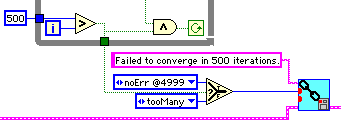
(If you're not following the directions to ignore Chained Find First Error.vi, you may have noticed that it's grown red dots. This is the updated version capable of handling offset enums (and extended explanations). But more about those capabilities later.)
The ![]() Error-Handling Package uses the convention that any numeric value incorporated in the zeroth string of the enum specifies an offset to be applied to other values in the enum, PROVIDED that the numeric value is preceded by an @ sign. (An enum of e-mail addresses that used the dot notation for domains would give interesting results if it got wired into an error node!) If the @ is followed immediately by an upper or lower case "X", the value is interpreted as being hexadecimal (useful for mapped bits in an error register). Since the actual errors start at enum value 1, the numerical value needs to be one less than the value at which you want the error codes to start. Examples for the two data sets presented in Figures 1 and 3 above are presented in Figure 8 below. Update Error Enum.vi is provided in the package to maintain synchrony between the error definition file and its associated enum or to create the enum in the first place. Variant to Error Code.vi is provided to convert the output of such an enum to the desired I32 value. (The Variant input allows normal I32 error codes to pass through this VI as well.)
Error-Handling Package uses the convention that any numeric value incorporated in the zeroth string of the enum specifies an offset to be applied to other values in the enum, PROVIDED that the numeric value is preceded by an @ sign. (An enum of e-mail addresses that used the dot notation for domains would give interesting results if it got wired into an error node!) If the @ is followed immediately by an upper or lower case "X", the value is interpreted as being hexadecimal (useful for mapped bits in an error register). Since the actual errors start at enum value 1, the numerical value needs to be one less than the value at which you want the error codes to start. Examples for the two data sets presented in Figures 1 and 3 above are presented in Figure 8 below. Update Error Enum.vi is provided in the package to maintain synchrony between the error definition file and its associated enum or to create the enum in the first place. Variant to Error Code.vi is provided to convert the output of such an enum to the desired I32 value. (The Variant input allows normal I32 error codes to pass through this VI as well.)
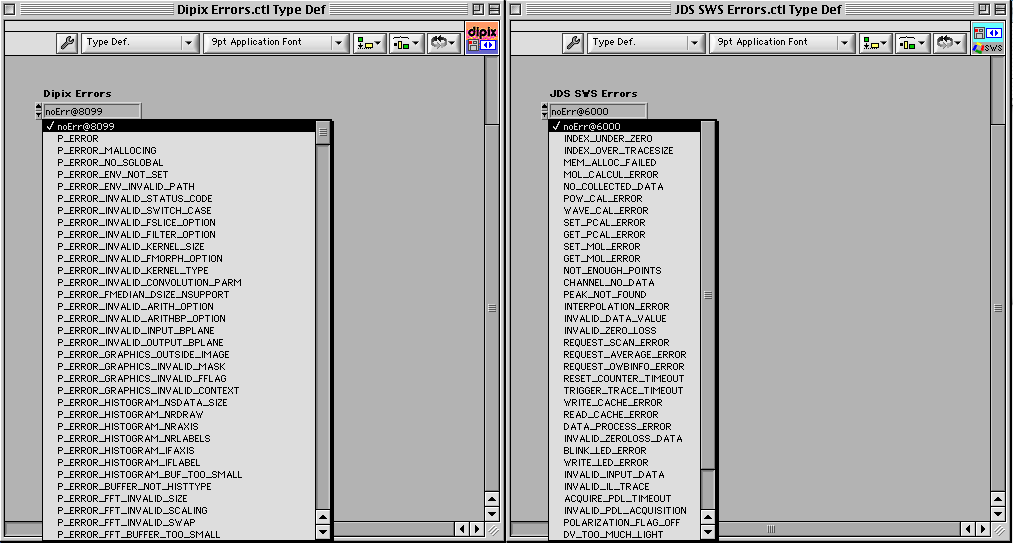
There is no need to restrict the @ notation to the zeroth entry in the enum. Variant to Error Code.vi interprets the notation to reassign any later entries as well, but on an individual basis with no effect on the items that follow. This means you can incorporate some generally useful built-in code directly in your custom error set, as shown in Figure 9.
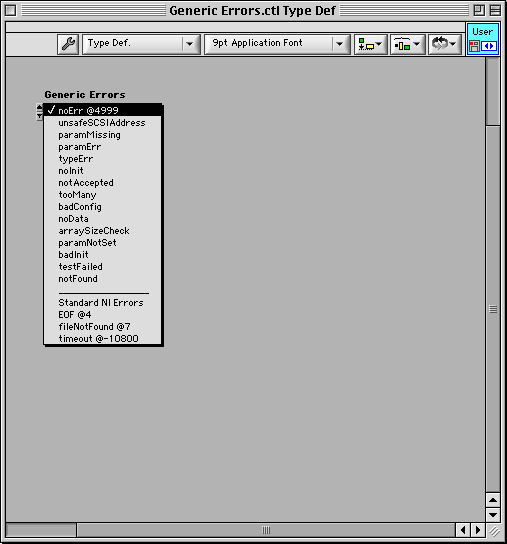
The built-in codes are usually more usefully accessed through the dedicated enums, Common LabVIEW Error Codes.ctl and Common DAQ Error Codes.ctl, included in the package.
As mentioned above, the offset error enums need Variant to Error Code.vi to be really useful, but you will rarely if ever use this VI explicitly. Most of the time you will want to incorporate the errors you create into a standard LabVIEW error cluster and wire them through your code in the standard error chain manner. To facilitate this, we have upgraded our workhorse Chained Find First Error.vi to accept the new error enums interchangeably with the old-fashioned error codes (by incorporating Variant to Error Code within it). To accept either data type at one terminal, the data type of the terminal must be variant. Anything can be automatically converted to a variant, so wiring either an enum or an I32 to Chained Find First Error will result in a coercion dot. If you hate coercions as much as I do (In C, they usually mean I've made a mistake.), you've set your coercion dot color to red to make it easier to root them out. To relieve you of the need to explicitly convert things to variant type, I incorporate a red dot in VI icons at variant terminals. You'll get automatic conversion but won't be bothered by the dots (at least they don't bother me when they are there already) and the code will make sure the data is of an expected type (an enum or an integer, in this case).
Don't be concerned that mixing enums and integers will slow things down. Most of the time your code doesn't create errors (or you have something far worse to be concerned about). Variant to Error Code is optimized for speed in the "no error" case. If there is an error, speed (at the microsecond level) is not a concern; things are already broken.
The new version of Chained Find First Error has all the features of the old one. It will find the first non-zero entry among its three error inputs: an error in cluster, an array of Error Codes, and a single Error Code. (By far the most common usage is with a single Error Code input, as in Figure 6 above.) Chained Find First Error will automatically add the entire call chain to the error source, if it is not already there, in the standard LabVIEW format, so your errors look just like those for built-in LabVIEW functions. If the error(s) come from subVIs or subsections of your VI, you can specify the origin(s) more precisely using the Subsources input to Chained Find First Error. Formatting a loop iteration counter or case selector into this input can be especially helpful (Figures 10 and 11).
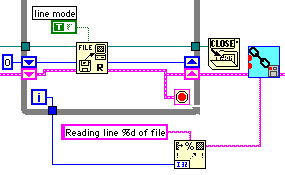
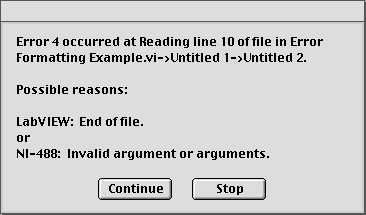
Specifying an error type helps a lot in pinning down the problem (especially if you have 545 Dipix error types to choose from), but often your code knows data much more helpful than the simple error codes. How many times have you wired in a separate dialog box to alert the user to the details of the error? Have you agonized over interrupting the program flow rather than just passing the information to a higher level, especially if your code is to be incorporated in some else's? The new version of Chained Find First Error solves this problem. You can wire detailed explanations into a new terminal on the VI (Figure 7) and the pertinent one will be incorporated (in parentheses) at the start of the error source string in the error cluster. Now your detailed comment can be handled exactly like the rest of the error information! (Be sure to check what the Smart Error Handlers do with this information below.)
Chained Find First Error also now reports errors that occur while it is handling errors. The source string gets convoluted trying to preserve as much information about both errors as possible, but this type of problem should occur only on the developer's bench and you should be able to figure out the mess.
Error Synthesis Demo.vi lets you get a better handle on the functioning of Chained Find First Error. Run it multiple times, changing the errors, explanations, subsources, etc., between runs. The demo suppresses the error dialog (so you don't have to keep pressing the OK button) but opens the Smart Simple Error Handler front panel so that you can see the messages anyway.
Smart Simple Error Handler.vi and Smart General Error Handler.vi are of the same vintage as Chained Find First Error.vi. Those of you who have used them know that they use VIs nearly identical to those shown in Figure 1 and Figure 3 feeding the [user-defined codes] and [user-defined descriptions] inputs of General Error Handler.vi to integrate user errors into the error dialog boxes. You also know that they remember the type of dialog specified most recently, so that a dialog type could be set in one place and be effective for all instances of the Error Handlers throughout the session. (If you tried the temporary local override to the dialog type, you likely found it faulty. It has been fixed in the current version.)
Looking at Figure 1, even without the hint of the previous section, it is obvious that the second and fourth columns could be used to supply the General Error Handler with the appropriate information to extend its capabilities to the user errors. A glance at the block diagram (Figure 12) will show that the Vendor Error number, the Error Name, and the singular form of the VI's name are all combined with the Description column to create a set of error descriptions in a form more similar to the built-in "LabVIEW: File already open."
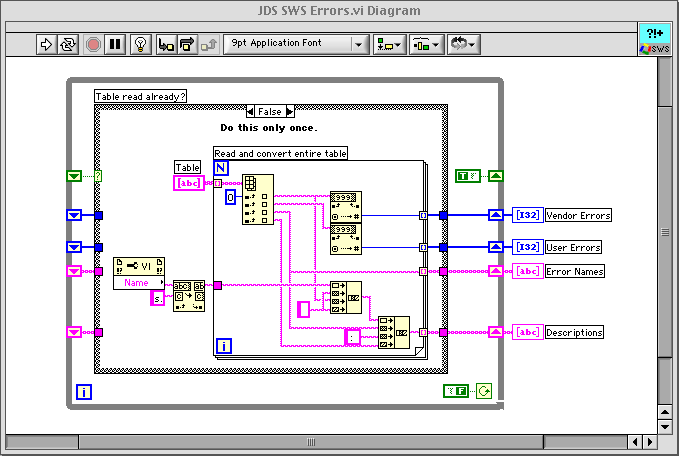
The block diagram of the older Smart General Error Handler required manual construction of a cumulative error table, like that in Figure 1, containing all the errors for all the components used. You either had to have a different Smart General Error Handler for each project or a single very comprehensive one. In addition, you needed to duplicate this information in separate tables for each device for which you were going to convert vendor errors to the User Error range. The new version (Figure 13) uses a slightly different Master Errors.vi that actually accumulates, sorts, and combines multiple error tables of the Figure 1 type. Master Errors already contains the basic User Errors. During program initialization, you merely wire any additional error tables you need to it (Figure 14). Master Errors reads all these tables into its shift registers and even forms descriptions analogous to Figure 15 when the same User Error Code appears in multiple packages. (The Dipix errors were temporarily remapped onto the JDS SWS range to produce this example. Master Errors is smart enough not to duplicate messages that are identical in code, package, and description.) A single copy of each error table is sufficient. If you run multiple top-level VIs in a single LabVIEW session, the Master Errors list will grow, if necessary, as each new application is started.
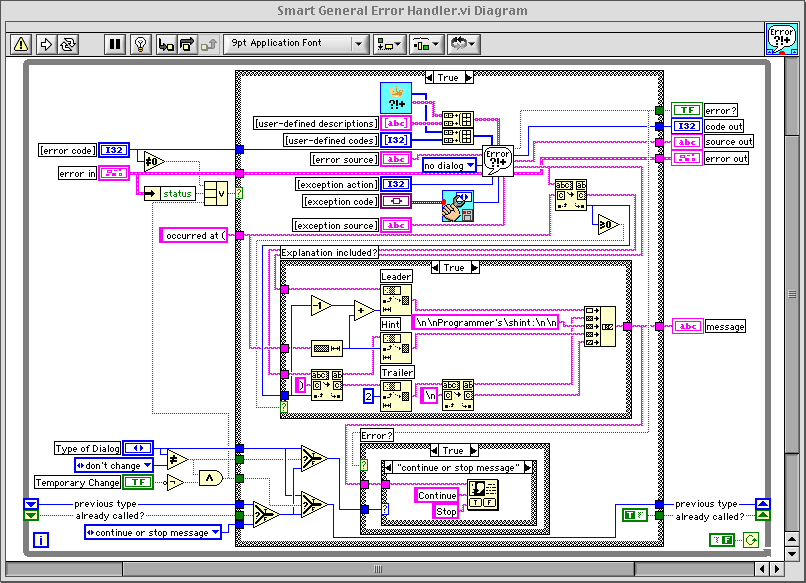

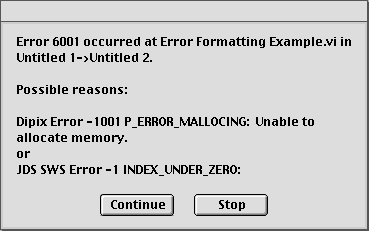
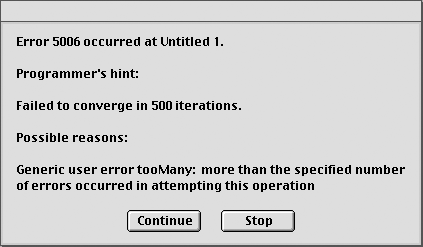
Recall that Chained Find First Error allowed for additional explanations that appeared in parentheses at the start of the error source string. In the standard error dialog, this would appear immediately after "occurred at". Notice that in Figure 13 the dialog from the General Error Handler is suppressed and this explanation between the parentheses is presented as a new, first, programmer's hint in the dialog actually displayed (Figure 16 from the diagram of Figure 7). This gives you a very professional way to tell the user, "Dummy, you forgot to turn on the auxiliary power!"
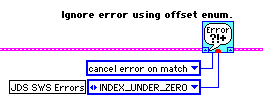
Notice that little red dot at the bottom of Smart General Error Handler? That means you can ignore errors of your choice with the very intelligible and easily formed construct of Figure 17. (You were wondering why you could possibly want enums of built-in errors? Here's why!)
Error Analysis Demo.vi demonstrates the various capabilities of the Smart Error Handlers. Run it with execution highlighting turned on so that you can see what causes each of the error dialogs. (You will have to press the OK buttons for this demo. Sorry!)
Isn't this the way the error package should work? Try it out. See how you like it.
And the next time you need LabVIEW design and programming of this quality, try ![]() .
.