There are two features which were especially critical to accomplishing the GUI implementation quickly. First, the capture of the connectivity of the model (which can be determined only through cooperation among the various components) had to be isolated completely from the capture of the parameters of the individual components (which are independent of any other component). Second, Simulink has the same general proscription of loops as LabVIEW. In general, loops only execute properly if they contain at least one special element such as an integrator or a unit delay. The loop "breaker" must have a particular internal structure, which allows the output part of the component to run independently of the input part. I included this structure right into the design of the basic EDFA component. Any EDFA component will effectively break the proscribed type of loop. These two features were incorporated into primitives that were used to build the initial components. The primitives are provided in a second palette for building any additional components that might be required, ensuring that these restrictions are always observed, even if a future developer is unaware of their importance.
As the client had requested, all the pertinent component types are available from the palette shown in Figure 1.
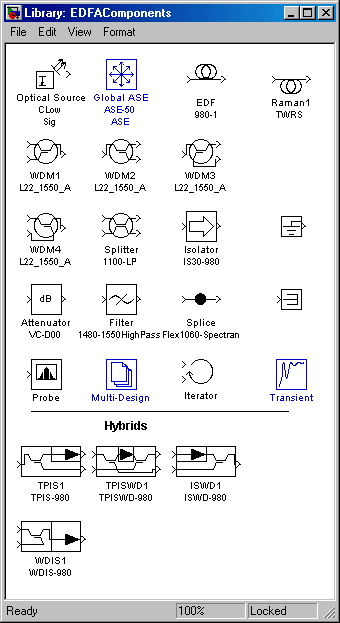
Obviously, there are now more than the nine components of the first demo. Consider first the icons above the horizontal rule.
The original Add and Drop have been replaced by four versions of the "WDM". These are functionally identical, but are required to meet Simulink's restriction that inputs and outputs are different types of terminals. The four instances handle add and drop configurations with forward and backward pumping.
A new real component, a Raman fiber, has been added. This was unforeseen at the start of the project but was readily built using the primitives mentioned above to maintain the properties critical to the performance of the GUI.
A pseudo-component, the probe, has been added to allow graphical, printed, or stored data on powers, gains, noise figures, etc., to be acquired at any point in the diagram.
Software from ![]() is designed to avoid superfluous warnings. If you get a warning or error message, there really is something wrong and you should act on it. Often an amplifier design will intentionally not use a particular input or output of a component (most commonly a splitter). Simulink will warn about such unconnected terminals. The ground and termination pseudo-components, the smaller boxes on the right of the panel, are provided so that the designer can mark such intentionally unconnected terminals and suppress the (in this case) superfluous warnings.
is designed to avoid superfluous warnings. If you get a warning or error message, there really is something wrong and you should act on it. Often an amplifier design will intentionally not use a particular input or output of a component (most commonly a splitter). Simulink will warn about such unconnected terminals. The ground and termination pseudo-components, the smaller boxes on the right of the panel, are provided so that the designer can mark such intentionally unconnected terminals and suppress the (in this case) superfluous warnings.
Three of the components are blue. These are globals that do not connect into the wiring on the diagram at all. They set and encapsulate parameters of the design as a whole. The "Global ASE" sets the wavelength mesh over which calculations are made. "Multi-design" handles multiple scenarios for the same design topology. "Transient" controls the real Simulink stuff mentioned in the "Swan" section.
Figure 2 shows two more blue components: "Components" and "Simulation Parameters". The first handles the proper assignment of ID numbers (the first column in the connection matrix) to the components and the second gives convenient access to such parameters as the precision to which results should be calculated. Every diagram must have one and only one of each of these, so the GUI includes them automatically in every new design sheet it creates and they are not available on the designer's palette. (They are, however, on the hidden pane of primitives for the software developer.) The GUI also places a default Global ASE component on the diagram, since every design must have a calculation mesh. The designer may include additional Global ASE components to give a finer mesh in certain critical wavelength regions, hence the inclusion of this component on the palette. (Such additions are not normally necessary since the simulator automatically adds all source wavelengths to the mesh and, optionally, makes the mesh finer over regions covered by multi-line sources.)
That leaves one more, black, component above the line, the Iterator. This component controls design optimization, Monte Carlo simulations, and looping over ranges of parameters.
Below the rule are hybrid components. Physically, hybrids are multiple simple components in a single package. Therefore, they are modelled as Simulink SubSytems of the basic components and appear on this pane of the palette to be used just as if they were basic components.
The primitives mentioned earlier, from which the basic components are built, are on a hidden pane within this palette, out of the way of the ordinary designer but readily available to the tool developer.
Double clicking on the icon of any component on the diagram brings up a front panel appropriate for that component, such as the Optical Source panel shown in Figure 2.
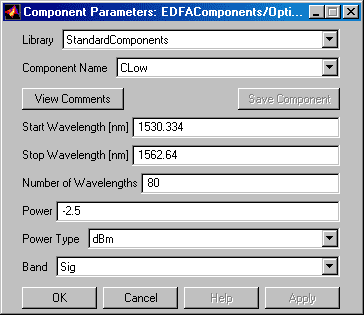
The top three rows and the bottom row of buttons are common to all panels. The topmost control allows the designer to choose different libraries of components. One library contains the catalog parts available to all designers. Another contains custom parts, which the designer may develop, such as ideal components, candidate new devices, pathological cases for testing the simulation kernel, etc. The second control selects a particular component from the chosen library. The third row allows viewing of additional information about the component and the saving of custom components. This last button is grayed out in the figure because no parameters have been changed yet and the current component is identical to the catalog one. The buttons along the bottom have their obvious standard functionality.
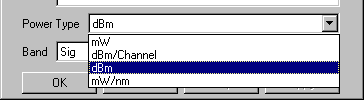
The controls in the middle vary among the component types. Some, such as the optical source wavelengths, accept arbitrary numerical values, which are checked against the allowed values defined for this particular component. To use a value outside the defined range, the designer must store this component as a new, custom, component. Others, like the bottom two (and the top two) in the figure, accept only discrete entries chosen from a pop-up (Figure 3).